Electricity powers nearly every aspect of modern living, from lighting and climate control to appliances, entertainment systems, and home offices. Yet behind the walls of every home lies a complex network of wiring and components that many homeowners rarely think about until a problem arises. Understanding residential electrical wiring is essential for maintaining safety, improving efficiency, and ensuring compliance with modern standards. As homes incorporate more technology and higher energy demands, the importance of proper wiring, timely upgrades, and adherence to safety protocols continues to grow.
Residential electrical wiring serves as the circulatory system of a home’s power distribution network. It carries electricity from the service panel to outlets, switches, lighting fixtures, and hardwired appliances. When installed and maintained correctly, this system operates quietly and reliably for decades. However, outdated materials, improper installations, and increased electrical loads can compromise safety and performance. Recognizing how wiring systems function—and when they require attention—empowers homeowners to make informed decisions about maintenance and upgrades. Click here to Learn More About Us.
At the core of any residential wiring system is the electrical service panel. This panel distributes incoming power into branch circuits that supply various areas of the home. Each circuit is protected by a breaker designed to interrupt power in the event of overload or short circuit. Wiring extends from the panel through walls, ceilings, and floors, connecting to outlets and fixtures. Modern homes typically use insulated copper wiring enclosed in protective sheathing, designed to withstand environmental conditions and prevent accidental contact.
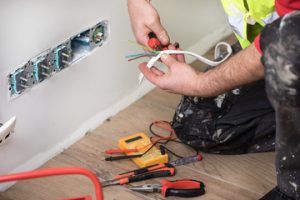
Safety remains the primary concern in residential electrical wiring. Faulty or deteriorating wiring is one of the leading causes of residential electrical fires. Over time, insulation can degrade due to heat, moisture, or pest damage. Loose connections can create resistance, leading to overheating and arcing. Older homes may contain wiring systems that no longer meet current safety standards or lack sufficient grounding protection. Regular inspections and professional evaluations help identify these risks before they escalate into serious hazards.
One of the most significant advancements in modern residential wiring standards involves protective devices. Ground Fault Circuit Interrupters (GFCIs) and Arc Fault Circuit Interrupters (AFCIs) are now widely required in new construction and renovations. GFCIs protect against electric shock by shutting off power when a ground fault is detected, making them essential in areas such as kitchens, bathrooms, and outdoor spaces. AFCIs, on the other hand, detect dangerous arc faults that could ignite fires. These devices represent critical safety upgrades that significantly reduce the likelihood of injury or property damage.
Homeowners should be aware of several warning signs that indicate potential wiring issues. Flickering lights, frequently tripped breakers, burning odors, discolored outlets, or buzzing sounds from walls may signal underlying electrical problems. Ignoring these symptoms can lead to larger system failures or fire hazards. In many cases, the issue stems from overloaded circuits, aging wiring, or improper modifications performed during past renovations. Addressing these concerns promptly helps preserve both safety and system integrity.
Upgrading residential electrical wiring is often necessary as energy demands increase. Modern households use far more electricity than homes built decades ago. Large appliances, high-definition entertainment systems, electric vehicle chargers, and smart home technologies all require substantial power. If the existing wiring system was designed for lower demand, it may struggle to handle current loads. Upgrades may involve adding new circuits, replacing outdated wiring, or increasing service panel capacity. These improvements not only enhance performance but also prevent overload conditions that can compromise safety.
When considering electrical upgrades, homeowners typically focus on several key improvements:
- Replacing outdated wiring systems with modern insulated copper wiring.
- Upgrading the electrical panel to support increased amperage.
- Installing additional dedicated circuits for high-demand appliances.
- Adding GFCI and AFCI protection where required by modern standards.
- Improving grounding and bonding systems to enhance safety.
Modern building standards also emphasize proper wire sizing and circuit design. Each circuit must be rated to handle the electrical load it serves. Undersized wiring can overheat when subjected to excessive current, increasing fire risk. Electricians calculate load requirements based on appliance ratings, lighting demands, and anticipated usage patterns. Ensuring correct wire gauge and breaker sizing is fundamental to safe and efficient power distribution.
Grounding is another critical aspect of residential wiring that directly impacts safety. A properly grounded system provides a safe pathway for fault currents, reducing the risk of electric shock. Grounding systems connect electrical components to the earth, allowing excess energy to dissipate harmlessly. Bonding ensures that metal enclosures and conductive materials remain at the same electrical potential, preventing dangerous voltage differences. Modern standards require comprehensive grounding and bonding to protect both occupants and equipment.
In addition to safety considerations, energy efficiency plays an increasingly important role in residential wiring decisions. Efficient wiring layouts reduce voltage drop and minimize energy waste. Upgrading to LED lighting, installing programmable switches, and integrating smart controls can further optimize energy consumption. While wiring itself does not generate electricity, its design and condition significantly influence system efficiency and reliability.
Renovations and home additions often present opportunities to modernize wiring systems. When walls are opened during remodeling, electricians can assess existing wiring and make necessary improvements. This proactive approach ensures that newly renovated spaces meet current safety codes and are equipped to handle modern electrical loads. Homeowners planning kitchen remodels, basement finishes, or room additions should prioritize electrical evaluations as part of their project planning.
Smart home technology has also influenced residential wiring standards. Automated lighting, integrated security systems, smart thermostats, and networked appliances require reliable power and often additional wiring or data cabling. Integrating these systems safely requires careful planning to avoid overloading circuits or compromising protective devices. Professional installation ensures compatibility, proper load management, and compliance with modern electrical codes.
Routine maintenance is just as important as initial installation. Even well-designed wiring systems benefit from periodic inspections. Electricians can test breakers, examine connections, verify grounding integrity, and assess overall system condition. Preventive maintenance helps detect early signs of wear, reducing the likelihood of unexpected failures. For older homes, scheduling inspections every few years is particularly advisable.
Homeowners should also understand the importance of avoiding do-it-yourself electrical modifications. While minor tasks such as replacing a light fixture may seem straightforward, improper wiring can introduce serious safety risks. Incorrect connections, inadequate grounding, or mismatched wire sizes can create hidden hazards that remain undetected until a failure occurs. Licensed professionals possess the training and tools necessary to ensure installations meet safety standards and building codes.
Modern residential wiring standards are designed to adapt to evolving technology and safety research. Electrical codes are periodically updated to reflect new findings and emerging risks. Staying informed about these changes allows homeowners to make strategic upgrades that enhance safety and future-proof their properties. For example, increasing panel capacity today may accommodate future additions such as solar panels or electric vehicle charging stations.
There are several long-term benefits associated with maintaining and upgrading residential electrical wiring:
- Enhanced safety through reduced fire and shock hazards.
- Improved reliability with fewer outages and breaker trips.
- Increased home value due to compliance with modern standards.
- Greater energy efficiency and reduced utility costs.
- Better accommodation of modern appliances and smart technologies.
Understanding residential electrical wiring empowers homeowners to view their electrical systems not as hidden infrastructure, but as critical components of home performance and safety. Just as plumbing and structural elements require maintenance, wiring systems demand attention and care. Proactive upgrades and inspections protect families, preserve property value, and ensure that homes remain adaptable to changing technological demands.
In conclusion, residential electrical wiring is a foundational element of modern living that deserves careful consideration. From safety devices and grounding systems to panel upgrades and circuit expansion, modern standards emphasize protection, efficiency, and reliability. As electrical demands continue to increase, homeowners must prioritize inspections, timely upgrades, and professional installation practices. By doing so, they create safer living environments, support energy efficiency, and ensure their homes are equipped to meet the challenges of today and tomorrow.